Climbing Gear 101: Harness, Helmet, Rope and Belay Basics
The first time you tie into a rope and lean back off the ground, you are trusting a small collection of gear with your life. That sounds dramatic, but it is literally true, and it is exactly why understanding your equipment is the foundation of the sport. The good news is that modern roped climbing runs on a surprisingly simple, well-proven system, and getting a handle on the climbing gear basics is far less intimidating than the wall of colorful hardware at your local gym might suggest. This guide walks you through the core kit piece by piece so you know what each item does and why it matters.
Here is what we will cover: how the safety chain fits together, then the harness, the rope, the belay device and carabiners, the helmet, the pre-climb partner check, and the smaller extras like shoes and chalk. We will finish with buying versus renting, when to retire gear, and how to get proper training. One important note before we start: this article is an introduction, not a substitute for hands-on instruction. Climbing is a hands-on, high-consequence skill, and no amount of reading replaces learning from a qualified instructor or a reputable gym. Think of this as a map, not the trip itself.
Climbing Gear Basics: How the Safety System Works
Roped climbing keeps you safe through a connected chain of components, and the chain is only as strong as its weakest link. Picture it from you outward: your harness wraps your body and gives you a single strong attachment point; the rope ties directly into that harness; the belayer manages the rope through a belay device; and that device is clipped to the belayer’s harness with a locking carabiner. If the climber falls or needs to rest, the belayer locks off the rope and the system holds. Every piece has a job, and every piece depends on the others being set up correctly.
Because the stakes are high, reputable climbing equipment is tested and certified. In Europe, gear sold as personal protective equipment must meet CE marking backed by EN standards (for example, EN 12277 for harnesses and EN 892 for dynamic ropes). On top of that, many manufacturers pursue certification from the UIAA, the International Climbing and Mountaineering Federation, whose standards are widely regarded as at least as strict as, and often the model for, the CE requirements. When you shop, look for CE and/or UIAA marks; they tell you the item was independently tested to a recognized safety standard.
The Harness: Parts, Fit, and Buckles
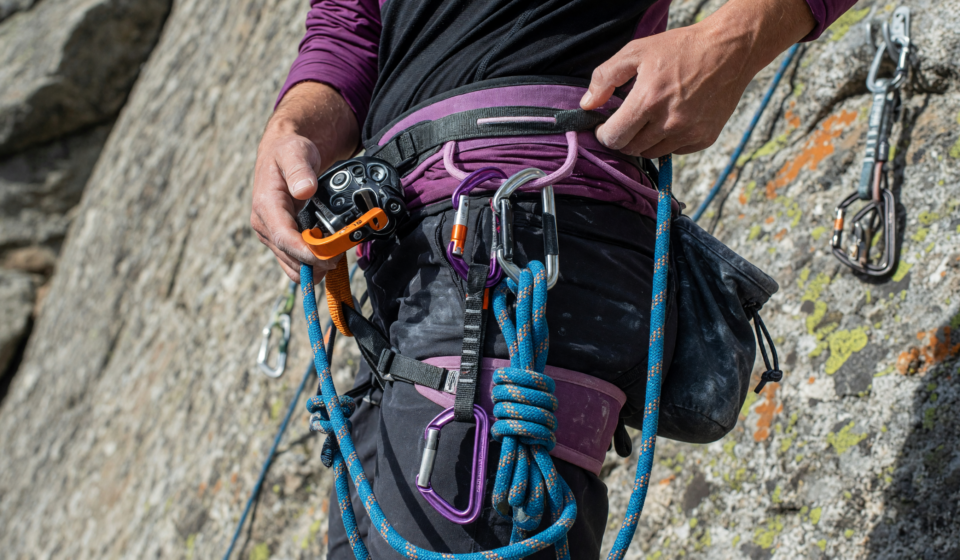
Your harness is your seat and your anchor to the system. A standard sit harness has a padded waist belt, two leg loops, and the critical piece that ties them together: the belay loop, a strong sewn loop at the front. There are also two tie-in points (the reinforced hard points on the waist belt and leg loops) where you thread the rope, plus gear loops on the sides for carrying equipment. The belay loop is where you clip your belay device; the tie-in points are where you tie the rope.
Fit is not a comfort preference; it is a safety feature. The waist belt should sit snugly above your hip bones so the harness cannot be pulled off over your hips, and it should be tight enough that you cannot yank it down, yet you can still breathe comfortably. Leg loops should be snug but not pinching. Always follow the manufacturer’s instructions for the buckles: many harnesses use buckles that must be doubled back (the webbing threaded back through) to be secure, while newer designs are pre-threaded and self-locking. Check your specific model, and confirm the buckles are correct every single time you climb.
👉 Shop climbing harness on Amazon (Ad — as an Amazon Associate, we earn from qualifying purchases.)
Ropes: Dynamic vs. Static, and How to Care for Them
Not all climbing ropes are the same, and using the wrong type is dangerous. A dynamic rope is engineered to stretch under load, absorbing the energy of a fall the way a bungee softens a jump. That stretch dramatically reduces the force on the climber, the belayer, and the anchor, which is why dynamic ropes are the standard for lead climbing and top-roping. A static rope has minimal stretch and is designed for jobs where you do not want the line bouncing: rappelling, hauling gear, fixed lines, and rescue work. You should never lead or take a fall on a static rope, because with little give the impact forces can be severe.
- Keep it clean and dry: Dirt and grit work into the fibers and cause internal wear; use a rope bag or tarp and wash when needed per the maker’s guidance.
- Protect it from chemicals and sharp edges: Store away from solvents, acids, and battery fumes, and watch for abrasion over rock edges.
- Inspect regularly: Run the whole rope through your hands to feel for flat spots, core damage, fuzzy sheath, or stiffness.
- Mind sun and age: UV exposure degrades nylon over time, so store ropes out of direct sunlight.
👉 Shop dynamic climbing rope on Amazon (Ad — as an Amazon Associate, we earn from qualifying purchases.)
Belay Devices and Locking Carabiners
The belay device is the tool the belayer uses to control the rope, adding friction so a single person can hold a much heavier falling climber. The most common beginner-friendly type is the tube-style device, often called an ATC (a popular Black Diamond model whose name became shorthand for the category). The rope runs through the device, and when the belayer pulls the brake strand down, the sharp bend pinches the rope and stops it. Tube devices are simple, versatile, and work well for belaying and rappelling, but they rely entirely on the belayer keeping a hand on the brake at all times.
Assisted-braking devices (ABDs), such as the Petzl GriGri, add a mechanism that helps pinch the rope when a fall loads it, offering a backup to the belayer’s brake hand. They are popular in gyms and for sport climbing, but they are not hands-free and still require correct technique. Whichever device you use, it connects to your belay loop with a locking carabiner whose gate screws or snaps shut so it cannot open accidentally under load. Get in the habit of confirming the carabiner is locked and clipped to the belay loop before anyone leaves the ground.
👉 Shop belay device and locking carabiner on Amazon (Ad — as an Amazon Associate, we earn from qualifying purchases.)
The Climbing Helmet
A climbing helmet does two jobs. First, it protects your head from falling objects, such as rockfall or dropped gear from climbers above, which is a real hazard on outdoor crags and multi-pitch routes. Second, it cushions impact if you fall and hit your head against the wall or flip upside down. Climbing helmets are built and certified to standards like EN 12492 and UIAA 106, which test both top and side protection differently than a standard industrial hard hat.
Fit matters here too: the helmet should sit level on your head, cover your forehead, and stay put when you shake your head, with the chin strap buckled and snug. While some gym top-rope settings make helmets optional, wearing one is a smart, low-cost habit, and it is essential outdoors. If a helmet takes a significant impact, retire it even if it looks fine, because the protective foam may be compromised.
👉 Shop climbing helmet on Amazon (Ad — as an Amazon Associate, we earn from qualifying purchases.)
The Pre-Climb Partner Check and Commands
Even flawless gear fails you if it is set up wrong, so climbers use a buddy system: before every climb, the climber and belayer check each other. A thorough check takes about thirty seconds and can prevent the most common serious accidents. Never rush it, and never assume; verify.
- Harness: Waist belt snug above the hips, all buckles doubled back or secured per the manual.
- Knot: A correctly tied and dressed tie-in knot (commonly a figure-eight follow-through) through both tie-in points, with an adequate tail.
- Belay device and carabiner: Rope threaded correctly, locking carabiner through the belay loop and locked.
- Helmet: On, level, and buckled for both partners where appropriate.
Climbers also use standard verbal commands so both partners always know what is happening. The climber asks “On belay?” and the belayer replies “Belay on” once the system is ready. The climber calls “Climbing,” the belayer answers “Climb on,” and away you go. Other key calls include “Take” (pull the rope tight), “Lower” and “Lowering,” “Off belay” and “Belay off,” and the universal warning “Rock!” for any falling object. Clear, consistent communication is a core safety tool, not an afterthought.
Safety first. A partner check and clear commands are non-negotiable, every climb, every time. The two most preventable accidents in climbing come from an unfinished tie-in knot and an unlocked or misrigged belay. Thirty seconds of checking is cheap insurance.
Shoes and Chalk: The Small but Useful Extras
Two items round out the beginner kit, and while neither is a safety-critical part of the rope system, both make climbing easier and more enjoyable. Climbing shoes have sticky rubber soles and a snug fit that let you stand on tiny holds and edges you could never use in sneakers. For your first sessions, a comfortable, moderately snug fit beats a painfully tight “performance” fit. Rental shoes at a gym are a perfectly good way to start.
Chalk, usually magnesium carbonate, dries sweat on your hands so you can grip better, carried in a small chalk bag at your waist. It is inexpensive and optional at first, but most climbers quickly adopt it. Neither shoes nor chalk substitutes for the core safety gear, so do not let the fun accessories distract from getting the harness, rope, belay, and helmet right.
Buying vs. Renting, and When to Retire Gear
You do not need to buy everything on day one. Most gyms rent harnesses, shoes, and belay devices, which is a smart, low-cost way to try the sport before you invest. When you are ready to buy, start with a harness, a belay device, a couple of locking carabiners, a helmet, and shoes; a rope usually comes later, once you know what kind of climbing you will do. Always buy safety gear new from reputable retailers, and be cautious about used hardware and especially used soft goods (harnesses, ropes, slings), whose history you cannot verify.
All climbing gear has a service life and must be inspected and eventually retired. Soft goods degrade with use, age, UV, and chemicals; manufacturers typically publish a maximum lifespan (often around ten years from manufacture for unused nylon, and much less with heavy use). Retire any item immediately if it has been subjected to a severe fall or shock load, shows cuts, core damage, melted or fuzzy fibers, deep abrasion, or corrosion, or has contacted chemicals, or if you simply do not trust its history. Helmets should be retired after a significant impact. When in doubt, throw it out; gear is far cheaper than the alternative. Always follow the manufacturer’s inspection and retirement guidance for each specific product.
Getting Proper Instruction
This is the most important section, so we saved it for near the end. Reading about gear teaches you the vocabulary and the concepts, but climbing is a physical skill with real consequences, and the details, such as how to tie the knot correctly, how to belay smoothly, how to catch a fall, and how to build anchors, must be learned in person and practiced under supervision. Take a class at a climbing gym, hire a certified guide, or learn from an experienced, qualified mentor.
A good instructor will not only show you the correct techniques but also catch the small mistakes you cannot see yourself, and give you feedback until safe habits become automatic. Gyms typically require a belay test before they let you belay, and that is a feature, not a hassle. Treat your first months as apprenticeship: ask questions, double-check everything, and never let ego push you past your training.
The Bottom Line
Roped climbing is safer than it looks precisely because it relies on a well-understood, certified system of gear used correctly: a snug harness, the right dynamic rope, a belay device on a locked carabiner, a helmet, and a disciplined partner check before every climb. Learn what each piece does, buy CE and/or UIAA certified equipment, inspect and retire your gear on schedule, and use consistent commands with your partner. Then take the single most valuable step of all and get proper, hands-on instruction from a qualified professional. Master these fundamentals and you build the habits that let you enjoy a lifetime of climbing with confidence.
Disclaimer: This article is provided for general educational purposes and is NOT a substitute for hands-on instruction, certification, or professional guidance. Climbing is inherently dangerous and can result in serious injury or death. Do not rely on this guide to keep you safe; learn from a qualified instructor or certified guide, follow the manufacturer’s instructions for every piece of equipment, and always inspect and retire your gear appropriately.
Sources: UIAA (International Climbing and Mountaineering Federation) safety standards, including Standard 106 (helmets) and 121 (connectors); CE marking and EN standards (EN 12277 harnesses, EN 892 dynamic ropes, EN 12492 helmets); WeighMyRack (certifications and belay device guidance); ClimbingTechniques.org and Rope Wranglers (belay commands and partner checks); and reputable manufacturer inspection and retirement guidance.