Kids’ Bike Safety Setup: Fit, Visibility and First Solo Rides
There is a particular kind of pride on a child’s face the first time they pedal away without a steadying hand on the seat. It is also the moment most parents feel their stomach drop. That mix of freedom and worry is exactly why kids bike safety deserves a little planning before the wheels ever start turning. The good news is that most of what protects a young rider comes down to a handful of setup choices you make in the garage, not split-second reactions out on the road.
This guide walks through the three things that matter most in a solid kids bike safety setup: getting the helmet fit right, making your child visible to drivers, and preparing them for their first solo rides. Along the way we will lean on U.S. standards and agencies, including the Consumer Product Safety Commission (CPSC) and the National Highway Traffic Safety Administration (NHTSA), so you know which advice is backed by more than a hunch. No fear-mongering, no gadget worship, just the practical why behind each step.
Why Kids Bike Safety Starts With the Helmet
If you do only one thing for kids bike safety, make it a properly certified, properly fitted helmet. In the United States, bicycle helmets sold for consumer use are covered by a mandatory federal safety standard, 16 CFR Part 1203, administered by the CPSC. Any helmet meeting that standard carries a certification statement inside, usually on a sticker under the padding. That label is not marketing fluff; it means the helmet was tested to absorb impact energy in a controlled way.
A few things to look for and to teach your child:
- Look for the CPSC label: Skip any helmet, new or secondhand, that lacks the CPSC certification statement.
- Buy for the head, not the age: Sizes are based on head circumference. Measure with a soft tape just above the eyebrows rather than guessing by age.
- Avoid hand-me-down damage: A helmet that has taken a real impact may look fine but can be compromised inside. When in doubt, retire it.
- Mind the expiration: Foam and shell materials age. Many manufacturers suggest replacing helmets after several years even without a crash.
👉 Shop CPSC-certified kids bike helmet on Amazon (Ad — as an Amazon Associate, we earn from qualifying purchases.)
Dialing In the Fit: The Two-Finger Test
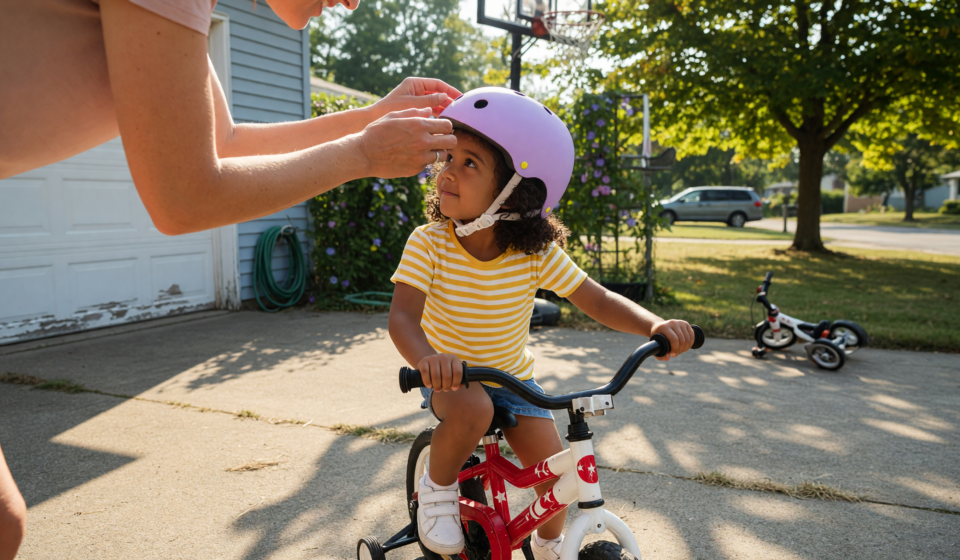
A certified helmet only protects when it sits correctly. A helmet tipped back on the crown, a common look on kids, leaves the forehead exposed in exactly the spot most likely to hit the ground. NHTSA publishes a simple fitting routine that is easy to remember and easy to teach, built around the “eyes, ears, mouth” checkpoints.
- Eyes: The helmet should sit level and low, with the front rim about two finger-widths above the eyebrows. Your child should be able to glance up and just see the edge.
- Ears: The side straps should form a V that meets just below and slightly in front of each ear.
- Mouth: With the chin strap buckled, you should be able to slip only about two fingers between the strap and the chin. Ask your child to open wide like a yawn; the helmet should press down slightly.
Finish with a quick shake test. Have your child nod and shake their head; a well-fitted helmet moves with the head, not independently of it. If it slides around, tighten the fit system or add the thicker sizing pads that came in the box. Fit changes as kids grow and as they trade a winter hat for summer hair, so recheck it every season.
One and done. A bicycle helmet is designed to protect in a single significant impact. If your child crashes and strikes their head, replace the helmet even if it looks undamaged, because the protective foam may have already done its job.
Right-Sizing the Bike Itself
A bike that is too big is one of the most common and most avoidable hazards for young riders. Parents often buy a size up “to grow into,” but a child who cannot comfortably reach the ground or the brakes loses the two things they need most: the ability to stop and the ability to catch themselves.
- Flat-foot the ground: For a new or nervous rider, both feet should reach the ground while seated. Confident riders can sit higher for efficient pedaling, but only once they can stop reliably.
- Reachable brakes: Small hands must be able to squeeze the brake levers fully. Many kids’ bikes have adjustable lever reach; move them closer to the grips if needed.
- Coaster versus hand brakes: Younger children often start on coaster (pedal-back) brakes, then add hand brakes as coordination develops. Make sure your child knows which type their bike has.
- A quick tune matters: Properly inflated tires, a snug chain, and working brakes make the bike easier and safer to control.
Being Seen: Reflectors, Lights and Bright Gear
Visibility is the quiet half of kids bike safety. A driver who sees a child early has time to slow down; a driver who spots them late does not. This is where U.S. standards give you a helpful baseline. Under CPSC’s bicycle regulation, 16 CFR Part 1512, new bikes are required to ship with a set of reflectors designed for nighttime visibility.
- Front and rear: A colorless (clear) front reflector and a red rear reflector.
- Pedals: Reflectors on the front and back faces of each pedal, which catch headlights as the legs move.
- Wheels: Side reflectors on the spokes, or reflective sidewalls, to make the bike visible from the side at intersections.
Those factory reflectors are the floor, not the ceiling. Reflectors only work when a light source is aimed at them, so they do little in dawn, dusk, fog, or shade. That is why safety advocates widely recommend adding active lights: a steady or blinking white light in front and a red light in the rear, mirroring how the reflectors are colored. Many riders now run a rear light during daytime too, since a flashing red dot helps drivers pick a child out against a busy background. Confirm your local and state rules, which often require a front light for riding after dark.
👉 Shop front and rear bike light set for kids on Amazon (Ad — as an Amazon Associate, we earn from qualifying purchases.)
Dress for Visibility, Not Just the Weather
Clothing does a surprising amount of work. Bright, high-contrast colors help in daylight, while retroreflective material is what actually lights up under headlights at night. The two are not the same, so the ideal kit combines both.
- Fluorescent by day: Neon yellow, green, or orange stands out against pavement and greenery in daylight.
- Reflective by night: Look for reflective strips, piping, or a lightweight reflective vest that catches car headlights.
- Movement draws the eye: Reflective elements on ankles and wrists move as your child pedals, which drivers notice faster than a static patch.
- Keep it clear of the chain: Avoid loose pant legs, long laces, or dangling straps that can snag in the drivetrain. Tuck, roll, or band them.
👉 Shop kids high-visibility reflective vest on Amazon (Ad — as an Amazon Associate, we earn from qualifying purchases.)
The Two-Minute Pre-Ride Check
A short, repeatable routine before every ride builds good habits and catches problems early. Many riders use the “ABC Quick Check” as a memory aid, and it works just as well for a seven-year-old as for an adult.
- A is for Air: Squeeze the tires. They should feel firm, not spongy.
- B is for Brakes: Roll the bike forward and squeeze the levers, or press back on the pedals, to confirm it stops.
- C is for Chain and Cranks: The chain should be on and turning smoothly, with nothing rubbing.
- Quick Check: Make sure nothing is loose, then do a slow test roll before heading out.
Turn it into a small ritual your child leads. When they run the check themselves, they start to understand the machine they are riding, which quietly makes them safer.
Getting Ready for First Solo Rides
Riding independently is a skill layered on top of riding a bike. A child can be a strong pedaler and still not be ready to judge traffic, so build up to solo outings in stages rather than all at once. Start where there are no cars.
- Master the basics first: Starting, stopping on command, steering around obstacles, and looking back over the shoulder without swerving.
- Practice scanning and signaling: Teach your child to look left-right-left at driveways and intersections and to use simple hand signals.
- Ride the route together: Before any solo trip, ride the exact path with them a few times, pointing out where to stop, where cars appear, and where to walk the bike.
- Set clear rules: Agree on where they may ride, whether that is a park path or a specific block, and reinforce stopping fully at every stop sign and driveway.
- Sidewalks, paths and roads: Younger children are generally safer on paths away from traffic. Local rules on sidewalk riding vary, so check what applies where you live.
Readiness is about judgment as much as balance. A child who consistently stops at the end of the driveway, checks for cars, and keeps their focus on the road is showing you they are ready for a little more independence. That gradual handoff of responsibility is the real finish line.
👉 Shop kids protective gear set gloves and pads on Amazon (Ad — as an Amazon Associate, we earn from qualifying purchases.)
The Bottom Line
A safe young rider is mostly the product of unglamorous preparation: a CPSC-certified helmet that sits level and snug, a bike sized so small hands can stop and small feet can reach, a lit-up and bright-clothed rider that drivers spot early, and a patient, staged path toward that first solo ride. None of it requires expensive gear or nervous hovering. It just requires doing the setup once, doing it well, and rechecking as your child grows. Get those pieces right, and you can hand over a little more freedom each season with a lot less of that stomach-drop feeling.
Disclaimer: This article is for general educational purposes only and does not constitute safety, legal, or medical advice. Always follow the fitting and use instructions supplied with your child’s helmet and bicycle, and check the traffic laws that apply where you live. Supervise young or inexperienced riders as appropriate for their age and ability.
Sources: U.S. Consumer Product Safety Commission (CPSC) Safety Standard for Bicycle Helmets, 16 CFR Part 1203; CPSC Requirements for Bicycles, 16 CFR Part 1512 (reflector requirements); National Highway Traffic Safety Administration (NHTSA), “Fitting a Bicycle Helmet.”