Ski & Snowboard Helmets and Goggles: A Complete Safety Guide
The mountain looks peaceful from the lodge, but a day on snow is a day spent moving fast over hard, unpredictable terrain. Ice, trees, lift towers, and other riders all share the hill with you, and a fall at speed sends more energy into your head than most people ever imagine. That is exactly why a properly certified ski helmet and goggles belong on your packing list before your pass, your gloves, or that new jacket. They are not accessories. They are the two pieces of gear standing between your skull, your eyes, and the mountain.
This guide walks you through everything that actually matters for head and eye protection on snow. We cover helmet safety standards like ASTM F2040 and EN 1077, what MIPS rotational protection does, how to dial in a correct helmet fit, and when a helmet has to be retired. Then we turn to goggles, because clear, protected vision is a genuine safety system: understanding lens tint and VLT, anti-fog and ventilation, UV protection, and how to pair your goggles and helmet so there is no exposed gap. Whether you ski, ride, or chase both, the goal is simple, warm, and practical protection you will actually wear.
Why Helmets Matter on Snow
Skiing and snowboarding put you on a slick surface at speeds that can easily reach highway numbers on a steep pitch. A head striking packed snow, ice, or a fixed object decelerates violently, and the brain does not have to leave the skull to be injured. A helmet works by managing that energy: its outer shell spreads the force of impact, and the foam liner crushes to slow your head over a few extra milliseconds. Those milliseconds are the whole point, because they lower the peak forces reaching your brain.
Helmets are proven at reducing injuries caused by straight-line, or linear, impacts, such as skull fractures and scalp lacerations. What no helmet can promise is total protection. It cannot prevent every concussion, and it does nothing to keep you from skiing beyond your ability. Think of it as one layer in a system that also includes control, awareness, and honest terrain choices. Wearing one is a habit worth building on your very first run of the season and never breaking.
👉 Shop certified ski/snowboard helmet on Amazon (Ad — as an Amazon Associate, we earn from qualifying purchases.)
Helmet Safety Standards and MIPS
A helmet only counts as protective equipment if it has passed a recognized standard. For snow sports in the United States, the benchmark is ASTM F2040, the Standard Specification for Helmets Used for Recreational Snow Sports, developed by ASTM International. In Europe you will see EN 1077, which comes in two classes: Class A offers more coverage and higher impact protection, while Class B is lighter and allows more ventilation and hearing, with reduced ear coverage. A smaller number of helmets also carry Snell RS-98, a voluntary standard from the Snell Memorial Foundation that is generally regarded as more demanding. Look for a certification label sewn or molded into the helmet, and treat an uncertified novelty lid as no protection at all.
These traditional standards test mostly linear impacts, but many real crashes are angled, spinning your head as it strikes. That rotational motion is strongly associated with brain injury, and it is where MIPS (the Multi-directional Impact Protection System) comes in. MIPS adds a low-friction layer inside the helmet that lets the shell rotate slightly relative to your head during an angled hit, aiming to redirect some of that rotational energy away from the brain. Other brands use their own slip-plane technologies to the same end. A MIPS or equivalent liner is not a substitute for a certified shell; it is an added feature layered on top of one.
Look for the label. A helmet without an ASTM F2040, EN 1077, or Snell RS-98 mark has not been independently tested for snow sports. Certification is the floor, not the ceiling, of what you should accept.
👉 Shop MIPS helmet on Amazon (Ad — as an Amazon Associate, we earn from qualifying purchases.)
Getting the Right Helmet Fit
A certified helmet that fits poorly protects poorly. Fit is what keeps the helmet in the right position at the exact moment you need it, so it is worth taking the time to get right rather than grabbing whatever is on sale in your usual size.
- Measure first: Wrap a soft tape around your head just above the eyebrows and ears, then match that measurement to the manufacturer’s size chart rather than guessing.
- Snug, not tight: The helmet should feel evenly snug all the way around, with no pressure points that create a headache after a few minutes.
- No gaps: There should be no space between the foam and your head, and the helmet should sit level, covering your forehead without tipping back.
- Shake test: With the chin strap undone, shake your head side to side and nod. The helmet should move your skin slightly and stay put, not slide around independently.
- Strap and dial: Fasten the chin strap so two fingers fit underneath, and use the rear adjustment dial to fine-tune, but never rely on the dial to fix a shell that is the wrong size.
Try the helmet on with the goggles you plan to wear, and check that everything works together comfortably. A fit that feels good in the shop but pinches after an hour on the hill is a fit you will be tempted to loosen or leave behind, which defeats the purpose.
When to Replace a Helmet
A snow helmet’s foam liner is largely single-use by design. It protects by crushing, and once it has absorbed a significant impact, that crushed foam cannot do the job a second time even if the shell looks fine. Manufacturers are consistent on this point: replace your helmet after any crash involving a meaningful blow to the head, whether or not you can see damage. Hairline cracks, a compressed liner, or a shell that no longer sits right are all reasons to retire it immediately.
Even without a crash, helmets do not last forever. Sun exposure, temperature swings, sweat, and general aging gradually degrade the materials. A common manufacturer guideline is to replace a snow helmet roughly every three to five years of regular use, and sooner if you ride hard or store it carelessly. Keep it out of hot car trunks, avoid stickers and solvents that can weaken the shell, and never buy a used helmet whose history you do not know.
Why Goggles Are Safety Gear, Not Just Style
It is easy to file goggles under fashion, but on the mountain your ability to see clearly is a core part of staying safe. Goggles seal out wind that would otherwise make your eyes water and blur at speed, block snow and spray, and shield your eyes from branches and flying ice. They also protect against a hazard many riders underestimate: intense ultraviolet radiation, which is amplified by high altitude and reflected up off the snow. Left unprotected, that glare causes eye strain and, over a long day, painful snow blindness.
Good goggles do more than protect; they help you read the terrain. The right lens sharpens the difference between a smooth patch and a hidden bump, reveals ice, and keeps your vision usable when the light goes flat and white. Being able to see what is coming lets you react in time, which is why choosing the correct lens is a safety decision as much as a comfort one.
Understanding Lens Tint and VLT for Light Conditions
The key number on any snow lens is its VLT, or visible light transmission, expressed as the percentage of light the lens lets through to your eyes. A low VLT means a dark lens for bright days; a high VLT means a light lens that gathers what little light exists in gloom and storms. Matching VLT to the conditions is the single most useful skill in choosing goggles.
- Bright, sunny days (roughly under 25% VLT): Dark, often mirrored lenses in tints like platinum, gray, black, or red cut glare and keep your eyes relaxed under strong sun.
- Partly cloudy or mixed light (about 25 to 50% VLT): Versatile tints such as red, blue, and green balance glare control with contrast across a changing sky.
- Overcast and flat light (roughly 50% and up): Warm tints like yellow, gold, amber, and rose boost contrast, helping you pick out shape and texture when everything looks washed out.
- Night skiing (about 80 to 100% VLT): A clear or near-clear lens still shields your eyes from wind and cold while letting in as much light as possible.
Many goggles solve the changing-conditions problem with interchangeable lenses, letting you swap a bright-day lens for a low-light one in seconds. Photochromic lenses take it further by darkening and lightening automatically as the light shifts. If you can own only one lens, a mid-range VLT is the most forgiving all-rounder, but carrying a spare low-light lens transforms the days when clouds roll in.
👉 Shop interchangeable-lens goggles on Amazon (Ad — as an Amazon Associate, we earn from qualifying purchases.)
Goggle Features: Anti-Fog, UV, and OTG
Beyond tint, a few features separate goggles that perform from goggles that frustrate. Fog is the most common complaint, so look for a dual-pane lens, which insulates against the temperature difference that causes condensation, along with an anti-fog coating and generous top and side ventilation. Keeping goggles on your face rather than pushed up on your helmet, where they collect warm, moist air, does more to prevent fogging than anything else.
- UV protection: Choose lenses that block 100% of UVA and UVB rays; good snow lenses do this regardless of tint, so a lighter lens is not a weaker shield against ultraviolet.
- Anti-fog and ventilation: Dual-pane lenses, anti-fog treatments, and unobstructed vents work together to keep your view clear on hard climbs and warm afternoons.
- OTG design: Over-the-glasses goggles are built with channels in the foam to fit eyeglass arms, letting people who wear prescription glasses ride comfortably without switching to contacts.
- Fit and foam: Multi-layer face foam should seal evenly with no pressure points or light gaps, and a silicone-lined strap keeps everything anchored to your helmet.
👉 Shop snow goggles on Amazon (Ad — as an Amazon Associate, we earn from qualifying purchases.)
Helmet and Goggle Compatibility: No Gaper Gap
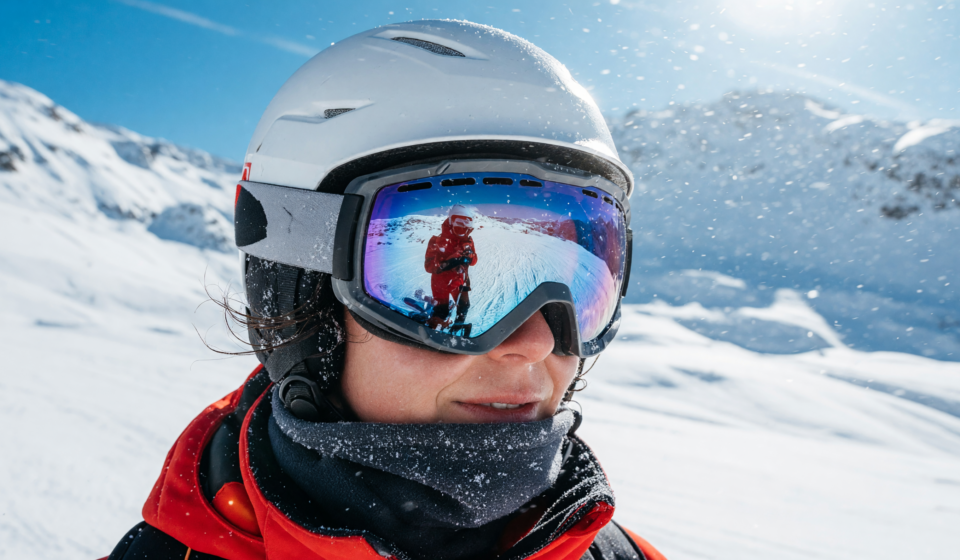
Helmets and goggles are a system, and they have to fit each other, not just your head and face. The telltale sign of a mismatch is the so-called gaper gap: a strip of exposed forehead between the top of the goggle frame and the brim of the helmet. Beyond looking like a rookie move, that gap leaves skin bare to cold, wind, and sun, and it usually means the two pieces are not sealing together the way they should.
The fix is to try them on together before you buy. The top edge of the goggles should meet the front edge of the helmet cleanly, with no gap and no crowding that pushes the goggles down your nose. Route the goggle strap around the outside of the helmet and use the helmet’s goggle clip if it has one. When the match is right, the frame vents and helmet vents cooperate to move air, which also helps keep the lens clear.
Kids’ Considerations
Children need the same certified protection adults do, sized specifically for them. Never buy a helmet a child will grow into, because a loose helmet slides on impact and can leave the head exposed at the worst moment. Measure their head, fit the helmet properly using the same snug, level, no-gaps checks, and recheck the fit each season as they grow. A youth-specific helmet built to ASTM F2040 or the equivalent, paired with goggles sized for a smaller face, is the right starting point.
Comfort matters even more with kids, because a child who finds their gear itchy or heavy will resist wearing it. Involve them in choosing a color or graphic they like, make sure the goggles do not pinch, and model the behavior yourself by always wearing your own helmet. Habits set early on the bunny slope tend to last a lifetime, and there is no better safety investment than a child who reaches for a helmet automatically.
The Bottom Line
Head and eye protection on snow comes down to a few clear principles. Start with a helmet that carries a recognized certification such as ASTM F2040, EN 1077, or Snell RS-98, and consider MIPS or a similar system for added rotational protection. Fit it snugly and level with no gaps, and retire it after any real impact or once it has aged past its service life. Choose goggles as deliberately as you choose the helmet: match the VLT to the day, insist on full UV protection and solid anti-fog design, and get an OTG pair if you wear glasses.
Finally, treat the two as one system. Fit your helmet and goggles together so there is no gaper gap, apply the same care to your kids’ gear, and remember that even the best equipment works only alongside good judgment. Ski and ride in control, within your ability, and your gear will be there to do its job on the day you need it most.
Disclaimer: This article is for general educational purposes only and is not a substitute for manufacturer instructions or professional advice. No helmet or pair of goggles can prevent all injury, and no product guarantees your safety. Always follow the fit and replacement guidance provided with your specific gear, choose equipment that carries a recognized safety certification, and ski and ride in control and within your ability at all times.
Sources: ASTM F2040 (ASTM International, Standard Specification for Helmets Used for Recreational Snow Sports); EN 1077 (Helmets for Alpine Skiers and Snowboarders, Class A and Class B); Snell RS-98 (Snell Memorial Foundation, Standard for Protective Headgear for Recreational Skiing and Snowboarding); MIPS (Multi-directional Impact Protection System); International Society for Snowsports Safety; manufacturer fit, replacement, and lens guidance from snow helmet and goggle makers including guidance on VLT and lens tint selection.